

|
Time Reporting Manual Version PT8x |
|
Time Reporting Manual Version PT8x |
Contents
2.2.1 Selecting Projects and Activities
2.2.2 Selecting Works and Operations
2.2.3 Additional Data and Overtime Reporting
2.2.5 Restricting and Sorting Data
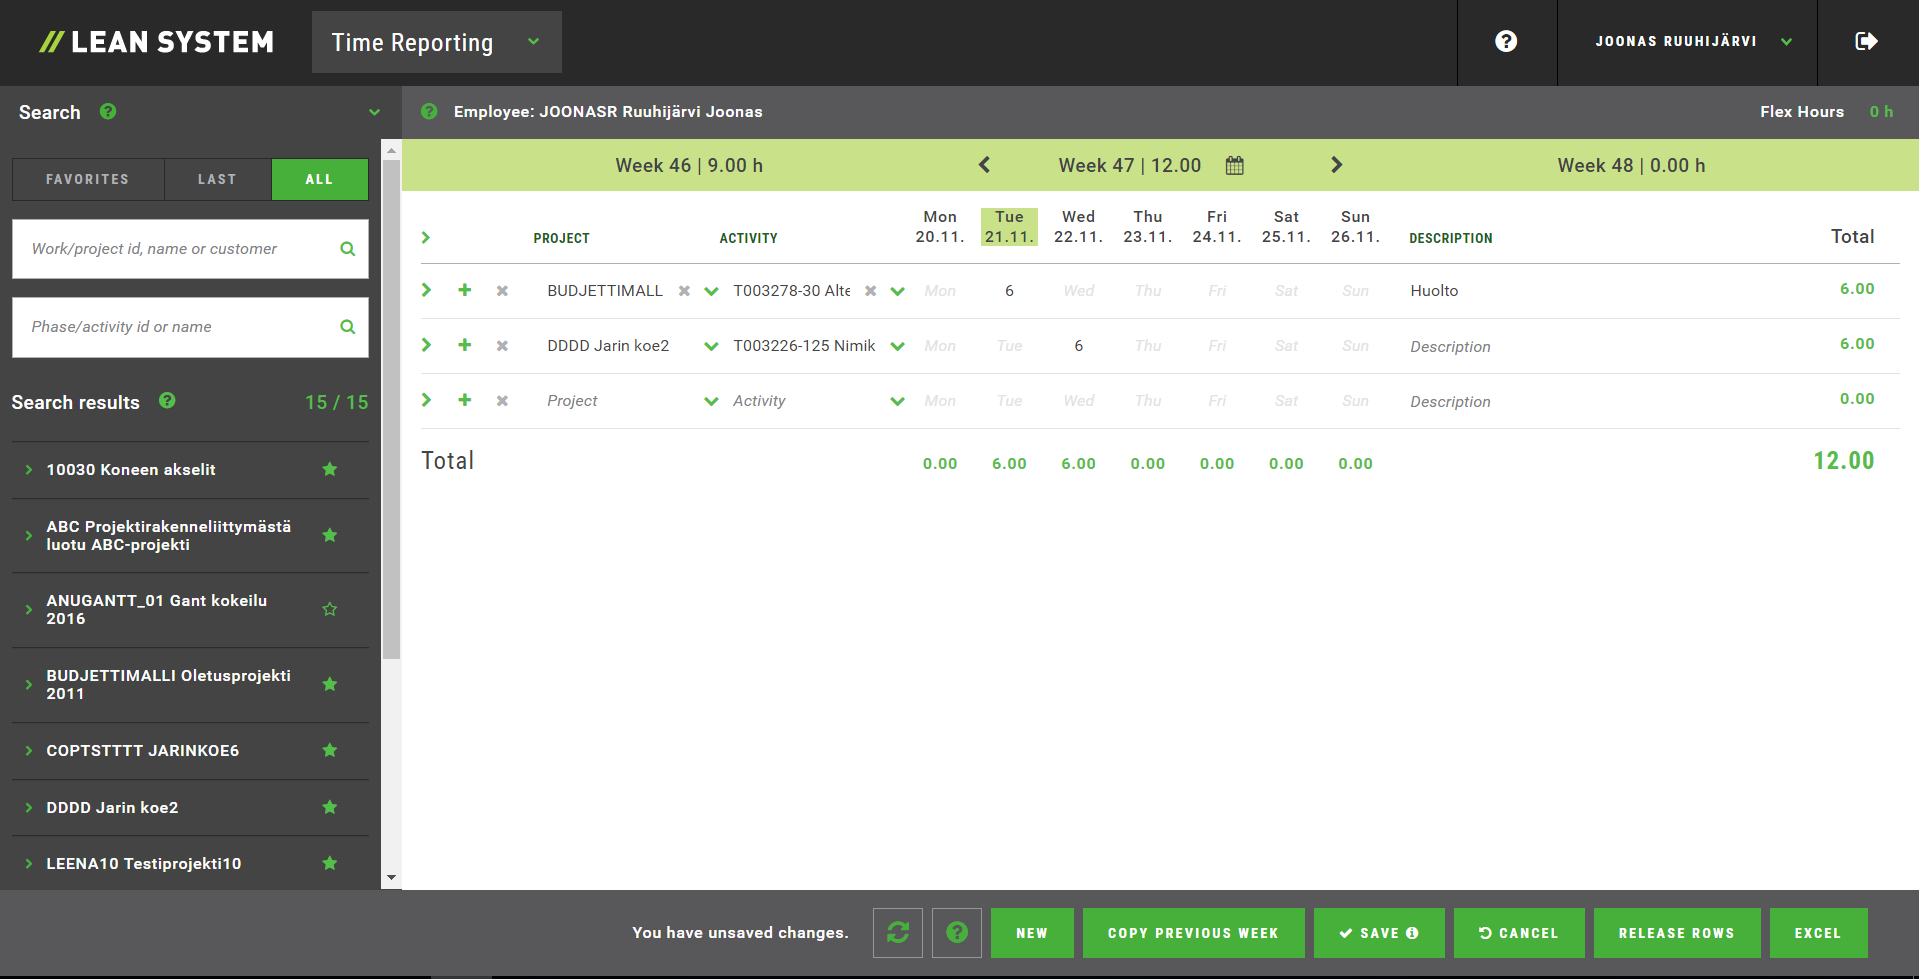
Figure 1 - The basic view in the Time Reporting portal.
Figure
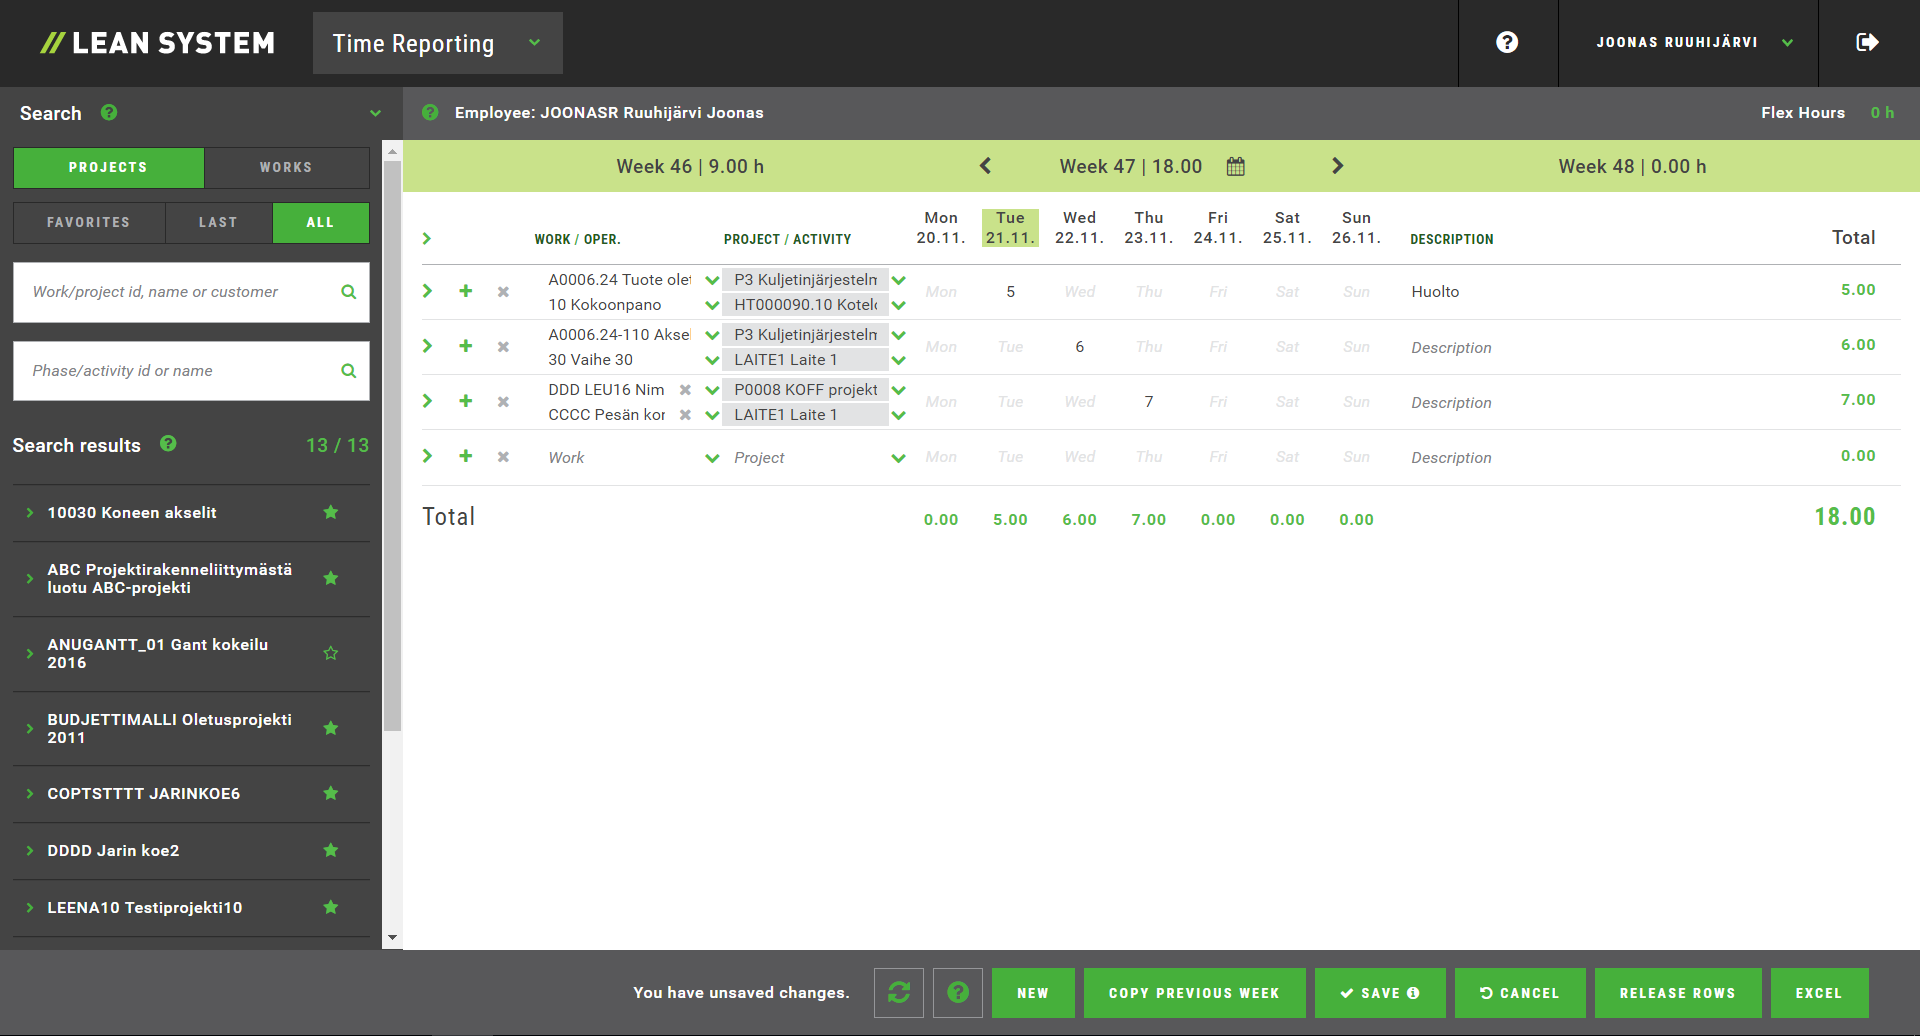
2 - The basic view in the
Time Reporting portal with the works and operations displayed.
Lean System’s Time Reporting portal has been designed to allow users to independently and conveniently report the hours they work. To save time and effort, users have the possibility to copy individual hour rows or even all hours of the previous week to the current week, and also select appropriate hour entry descriptions from among previous entries.
To facilitate the process of selecting projects and works for which hours are reported, the system suggests the most recently applied projects/works and also allows you to mark your own personal favorites. Projects and works can also be searched by ID, name or customer name. The portal features a search bar which enables you to directly insert new hour rows or to drag and drop desired activities or operations from the search bar into the appropriate row in the timesheet.
The Time Reporting portal supports touch screens and can also be used offline, provided that the necessary data have first been downloaded to the user’s device online. Once the network connection is available again, the data can be saved to the database as normal.
In the Time Reporting portal, hours can be entered for either projects or works. The employee's basic data defines which one of these reporting methods the employee can use, or whether both methods are enabled. The portal’s user interface adapts itself to these definitions.
When entering hours for works, the timesheet features separate columns for works, operations, projects and activities. Furthermore, the search bar displays works and projects under their own tabs. By contrast, if the works are not shown, the timesheet only shows the ‘Project’ and ‘Activity’ columns and the search bar only ‘Projects’.
Once a work has been selected on a timesheet row, its project and activity can no longer be changed, as they are determined by the work.
When opening the system for the first time, you should log in with your Lean System login credentials.
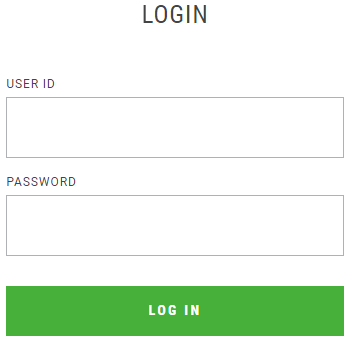
Figure 3 – Log-in box.
After the first log-in, you no longer need
to enter your credentials when using the same device, unless the system
separately requests this (e.g. do to session expiration) and provided that the
device is not used by others. Note! If using shared devices, you should always
log off at the end of each session by clicking on the power button icon ![]() in the top
right corner of the screen.
in the top
right corner of the screen.
To report hours in the portal, first select the appropriate allocation (depending on situation, either work+operation or project+activity; see Chapter ‘Time Reporting Methods’ and the following chapters), then record the hours for each day of the week and enter an appropriate description for the row.
Hours. In addition to allowing the user to type in the number of worked hours using the keyboard, some browsers feature up/down arrows in the hour entry fields for adjusting the number of hours. Each click on the arrows adds/subtracts the number of hours by half an hour.
Description. A description can be typed in from scratch or, if you have already selected a project, you can choose an applicable description from a list of descriptions most recently entered for that project. To display the selection list, simply type in a couple of characters in the ‘Description’ field, and the system displays a list of the latest descriptions that include the search string in question. Modifying the description after this does not affect the previously entered descriptions.
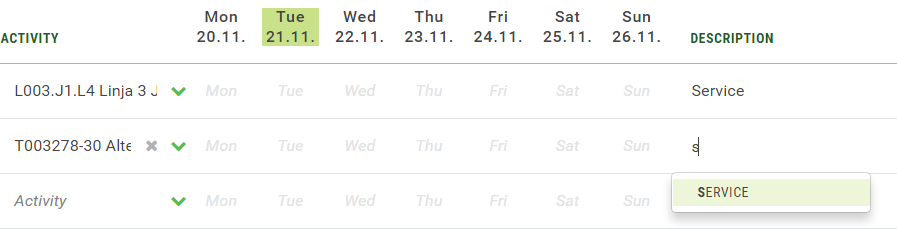
Figure 4 - Project descriptions can be selected from among descriptions previously entered for the same project by entering a search string in the ‘Description’ field.
If you are unable to modify the description, this means that different weekdays have been given a different description (see ‘Additional Data and Overtime Reporting’).
Time reporting row icons
|
|
|
Row’s Additional Data section closed (click to open) |
|
|
|
Row’s Additional Data section open (click to close) |
|
|
|
Row’s Additional Data section closed
(click to open); |
|
|
|
Row’s Additional Data section open
(click to close); |
|
|
|
Copy row |
|
|
|
Delete row |
|
|
|
Row status does not allow for modifying or deleting the row |
When modifying data on a timesheet row, the changes are automatically saved to the browser. I you also wish to save the data to the database, click ‘Save’.
|
Button |
Description |
|
Help |
Opens the Time Reporting Manual. (Note! The button is only available if a manual in the language of the user’s browser exists in the server’s directory.) |
|
New |
Inserts a new row for the week that is currently displayed in the timesheet. |
|
Copy Previous Week |
Copies the hours of the previous week to the currently open week (taking into account the possible value entered in the Copy column in the Additional Data section). |
|
Save |
Saves the data to the database (or to the browser if offline). |
|
Release Rows |
Changes the status of the timesheet rows to completed. |
|
Excel |
Exports the hours of the open week to a CSV file (can be opened with Excel, etc.). Settings allows to choose whether the function only exports the names or also the ID’s of projects, activities, parameters, etc. In addition, you can define the column and decimal separators to be used in the CSV file. (Usually, there is no need to modify these.) |
Projects and activities can be selected either directly through the timesheet fields or with the help of a separate search bar. The search bar takes advantage of the favorites tagged by the user and the most recently used projects and activities. With the search bar, you can either directly insert new rows into the timesheet, or drag and drop the desired project and activity from the search bar into an already existing timesheet row. You can also rename projects if you wish. (For more information, see Chapter ‘Search Bar’.)
To select a project through the timesheet, either click on a field in the ‘Project’ column or type a search string in the field. A click on the field opens a selection list of projects that have been fetched to the browser. Typing a search string, in turn, displays projects whose ID, name or customer name includes the given character string. The ID, name and customer name are also shown in their own columns in the selection list. In the example screenshot below, the user has typed in the search string ‘se’.
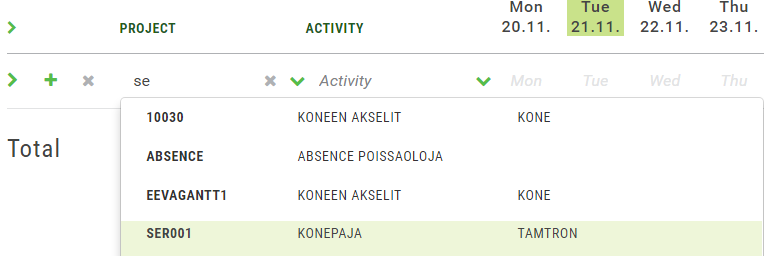
Figure 5 - An example of a selection list displayed when a search string has been typed in the ’Project’ field.
If using the portal online, the system simultaneously performs the search in the database with the same search value. In such case, the search might bring more options to the selection list, which might cause the list to update a little slower as when only displaying information that has already been fetched to the browser. The list of projects fetched to the browser is updated accordingly.
Once you have selected the appropriate project, the ’Activity’ field’s selection list will show the project’s activities. Activities are selected otherwise in the same way as projects, except for that the customer name is not included in the search. The columns in the selection list are activity ID and name.
If the project or activity selection list includes more results than can fit in the list at one time, the following notification text appears at the bottom of the list: ‘There are more search result rows than are displayed. Enter more characters to field in order to narrow down search results’. Thus, if the desired option does show up in the list, try entering a longer search string in the field.
If you need to remove selections, click on the cross sign (X) in the given entry field. Note that the cross appears only once the cursor is placed over some of the row’s fields.
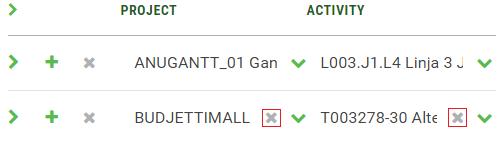
Figure 6 - Selections can be removed by clicking on the cross sign (X) in the given field.
Activities can also be searched over projects. In such case, the ‘Project’ field must be left empty (or cleared in the afore-mentioned way). Once you have ensured that the ‘Project’ field is empty, type in some characters of the desired activity ID or name in the ‘Activity’ field. As a result, a selection list of activities appears, displaying the activity ID, activity name and, in a third column, the project ID, name and customer name (Note! The data in this third column cannot be used as search criteria). The longer the search string, the more effective the search is.
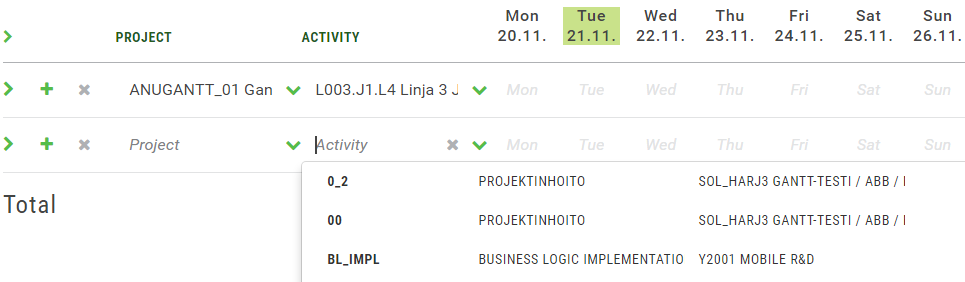
Figure 7 - An example of searching for activities without specifying the project.
Once the activity has been selected in the above-mentioned way, the row’s project is determined based on the activity. After this, the activity list only shows activities of that given project. If you wish to perform a new activity search over projects, the ‘Project’ field needs to be cleared as described above.
Works and operations can be selected either form the timesheet fields or using the separate search bar tool. The search bar functions take advantage of the Favorites tagged by the user and the most recently applied works and operations. The search bar can be used to insert new rows into the timesheet or to drag and drop the desired work and operation into an already existing timesheet row (For more information, see Chapter ‘Search Bar’).
To select a work from a timesheet field, either click on a field in the ’Works’ column or type a search string in the field. Clicking the field opens a selection list of works fetched to the browser, whereas typing a search string displays works whose ID, name or customer name include the given string. The ID, name or customer name are also displayed as separate columns in the selection list. In the example below, the user has typed in ‘e’.
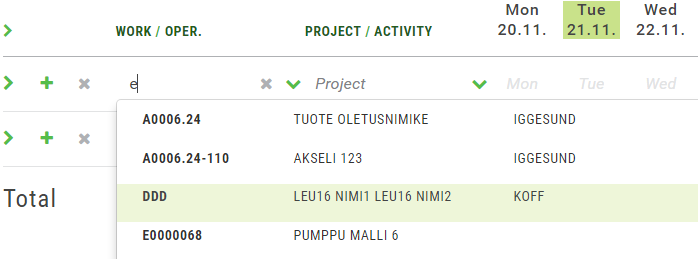
Figure 8 - An example of a search for works by typing a search string in a timesheet field.
If using the portal online, the system simultaneously performs the search in the database with the same search value. In such case, the search might bring more options to the selection list, causing the list to update a little slower as when only displaying information that has already been fetched to the browser. The list of projects fetched to the browser is updated accordingly.
Once you have selected the desired work, the row’s project and activity are updated according to the work. The project and activity can no longer be changed; their fields become non-editable. Under the ‘Work’ field, the timesheet features a field titled ‘Operation’ with a selection list of the selected work’s operations. Operations can be selected in the same way as works, except for that customer name is not included in the search. The columns of the selection list are operation ID and name.
If the work or operation list includes more results than can fit in the list at one time, the following text appears at the bottom of the list: ‘There are more search result rows than are displayed. Enter more characters to field in order to narrow down search results’. Thus, if the desired option does show up in the list, try entering a longer search string in the field.
Fields can be cleared by clicking on the cross sign (X). Note that the cross appears only once the cursor is placed over some of the row’s fields.
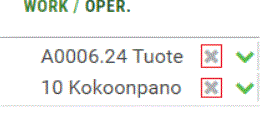
Figure 9 - Selections can be removed by clicking on the cross (X) in the given field.
The Time Reporting timesheet includes an
Additional Data section, which can be accessed by clicking on the arrow icon ![]() next to each
timesheet row; the table for entering additional data opens right below the row
in question. The additional data table features a separate row for each
weekday, and the information entered on those rows are automatically updated to
the corresponding rows in the actual timesheet.
next to each
timesheet row; the table for entering additional data opens right below the row
in question. The additional data table features a separate row for each
weekday, and the information entered on those rows are automatically updated to
the corresponding rows in the actual timesheet.
In addition to hours, a description and an internal description, the Additional Data section includes columns for further details, such as salary code and status. The columns are defined system-specifically; different columns can be displayed in different environments.
To report overtime, you need to insert two separate rows in the timesheet: one row to enter the normal working hours (e.g. 8h) and an additional row to enter the overtime hours (e.g. 2h). Next, open the Additional Data section of the overtime hours row and select the appropriate salary code and/or overtime code for it, such as ‘50% overtime’. If the column for the overtime code is not displayed, the system is able to automatically complete the code based on the salary code.
If displayed, the column titled ’Copying’ in the additional data table can be used to control the copying of the previous week’s hours to the currently open week. The selection ‘Copy Row’ means that all data of the row are copied, except for the number of hours. The selection ‘Copy Hours’, in turn, copies all data including the numbers of hours. The selection ‘Do Not Copy Row’ means that the row is not copied at all. If the ‘Copying’ column is not displayed, the default parameter value determines which of the definitions is valid.
In the ’Description’ column of the additional data table, you can add a description for each additional data row. If you wish, you may also give the same description to all additional data rows; in such case, the description can be modified in the actual timesheet as well, and the description of the additional rows will be automatically updated accordingly once you have finished modifying the timesheet description and moved the cursor away from the description field. However, if the descriptions of the additional data rows differ from each other, the description field in the actual timesheet row turns non-editable. The descriptions of the additional data rows are presented in a queue, separated by semicolons ( ; ). If the descriptions of additional data rows are changed to be same for all, the description field of the actual timesheet row becomes editable again.
The Additional Data section can be closed
by clicking on the downward arrow icon ![]() next to each timesheet row.
next to each timesheet row.
If any parameter values of any of the
additional data rows has been modified (so that they differ from the default
values), the arrows turn orange ![]()
![]() to indicate
that additional data has been entered.
to indicate
that additional data has been entered.
The number of the week currently displayed
in the timesheet is shown in the middle of the timesheet’s top bar, next to the
calendar icon ![]() . The
specific dates of each day of that week, in turn, are displayed in the column
headers under the three-letter weekday abbreviations (in ‘day.month’ format).
. The
specific dates of each day of that week, in turn, are displayed in the column
headers under the three-letter weekday abbreviations (in ‘day.month’ format).
To change the timesheet view to the previous or following week, click on either the week numbers on the light blue background or the arrow icons next to the calendar icon (see Figure 10 below).

Figure 10 - View of the currently open week, changing the displayed week to the previous or following week, and the link for opening the calendar.
You may also open the appropriate week for display via the calendar, which can be accessed by clicking either on the number of the currently displayed week or the calendar icon next to it. You can move forwards and backwards in the calendar with the arrow buttons. The appropriate month and year can also be easily selected by clicking on the Month Year header. Once you have found the desired week in the calendar, click on any day of that week to open it in the timesheet. The current week can be re-accessed by clicking on the calendar’s ‘Today’ button.
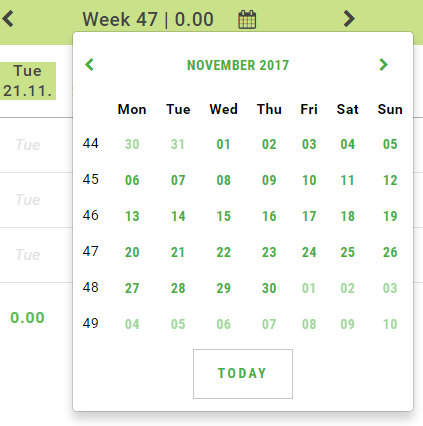
Figure 11 - Calendar open.
The data shown in the timesheet can be narrowed down with the help of restriction fields. To open these, click on the arrow icon to the left of the timesheet’s column headers.
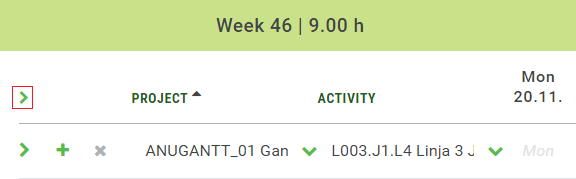
Figure 12 - The restriction fields can be brought on display by clicking on the arrow icon to the left of the column headers in the top bar.
If you type any number of characters in one or more restriction fields, the timesheet will only show those rows that include the given character string somewhere. You may also enter characters in more than one restriction field at one time, in which case all these search criteria need to be met for a row to be displayed. Note that the total sums of hours in the timesheet are calculated according to the restrictions.
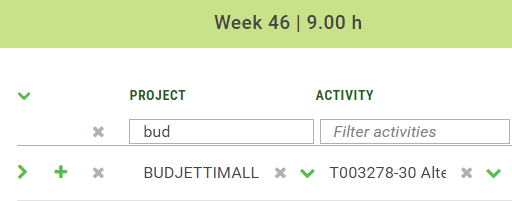
Figure 13 - An example of restricting data by project ID.
The restrictions can be cleared by clicking
on the cross icon ![]() to the left
of the restriction fields. Hiding the restriction fields (by clicking on the
above-mentioned arrow icon) also clears the restrictions.
to the left
of the restriction fields. Hiding the restriction fields (by clicking on the
above-mentioned arrow icon) also clears the restrictions.
The data shown in the timesheet can be sorted according to a desired column by clicking on the column header. To reverse the order of sorting, simply re-click on the column header. Note that sorting cannot be done according to hour columns.
New rows are always placed at the bottom of the timesheet until all data are either re-sorted by clicking on a column header or saved by clicking ‘Save’. By default, saving sorts the data by project and activity.
Figure 14 - An example of sorting the timesheet by project ID.
The search bar tool can be used for searching and selecting works, operations, projects and activities and to mark them as favorites, to rename projects and works and to transfer them into the timesheet.
The search bar can be displayed or hidden by clicking the search bar tab on the top.
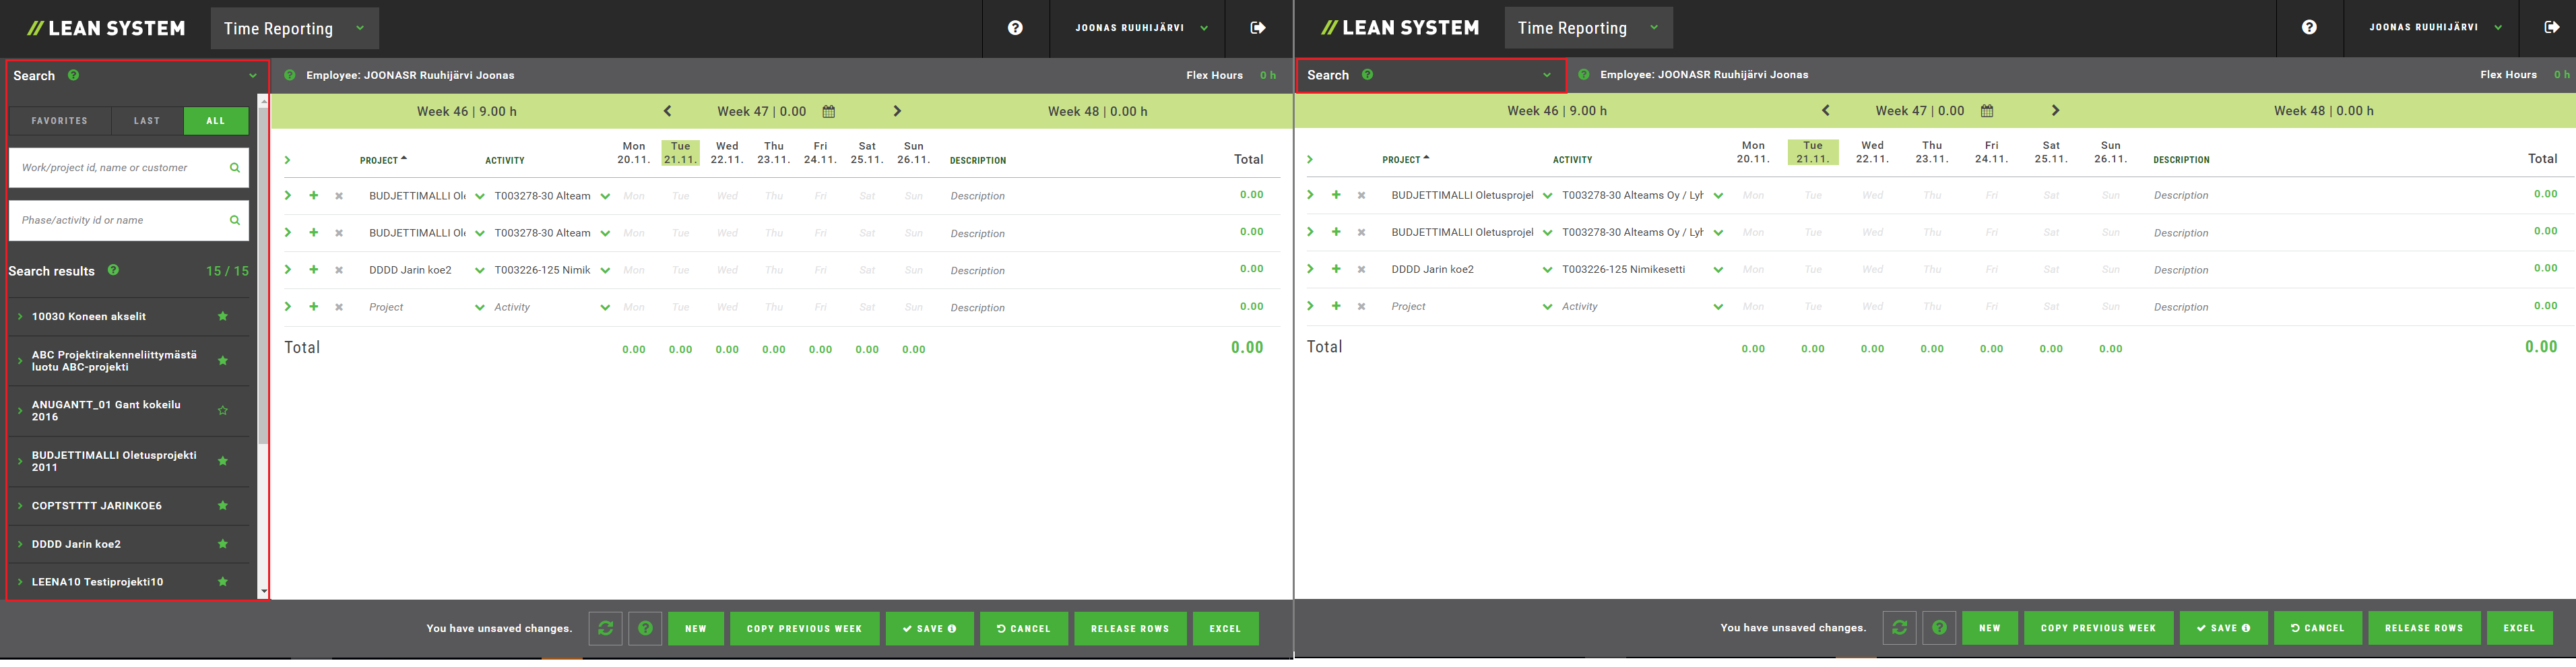
Figure 15 - Search bar displayed and search bar hidden.
![]()
Figure 16 - Selection buttons in the search bar.
The
’Favorites’ selection shows in the search bar only
those works, operations, projects and activities that you have marked as your
favorites. To mark Favorites, click on the star icon ![]() next to the
desired work/operation/project/activity name; the icon will turn from empty to
filled
next to the
desired work/operation/project/activity name; the icon will turn from empty to
filled ![]() . Conversely,
to remove from Favorites, re-click on the star icon so that it turns empty
again.
. Conversely,
to remove from Favorites, re-click on the star icon so that it turns empty
again.
The ’Last’ selection shows in the search bar only those works, operations and activities for which the user has reported hours during the last four weeks.
The ’All’ selection shows all projects that have been fetched to the user’s browser. At the top of the list are the favorites and most recently used alternatives, as these are fetched when first accessing the Time Reporting portal. The list is complemented based on searches made using the search bar fields and the timesheet’s selection fields.
Note! If either the ‘Favorites’ or ‘Last’ selection is active, the searches do not fetch new rows from the database (as these have already been fetched to the browser). By contrast, when the selection is set to ‘All’, the searches target not only those rows that have already been fetched to the browser, but also new rows that the search may have found in the database based on the search. If using the portal offline, database searches are never performed.
The Favorites/Last/All selection functions together with the search fields: the search bar only shows those that meet both the button and search field criteria.
The first search field restricts the search of works (if displayed) and projects. The search bar only shows those projects/works whose ID, name or customer name includes the entered search string somewhere. For example, if you enter a customer name, the search bar list will only show projects/works pertaining to that specific customer. The longer the search string, the more accurate and effective the search is.
The second search field allows you to narrow down the search of operations (if works are displayed) and activities. The search bar shows those activities/operations of the projects/works selected in the first search field whose ID or name includes the search string.
The search is restricted to the rows that have already been fetched to the browser. However, if the Favorites/Last/All selection button is set at ‘All’ and the user is online, the search is also performed in the database and the rows possibly found in the database complement the search bar list.
If the timesheet includes values that meet the criteria given in the search fields, these values are highlighted.
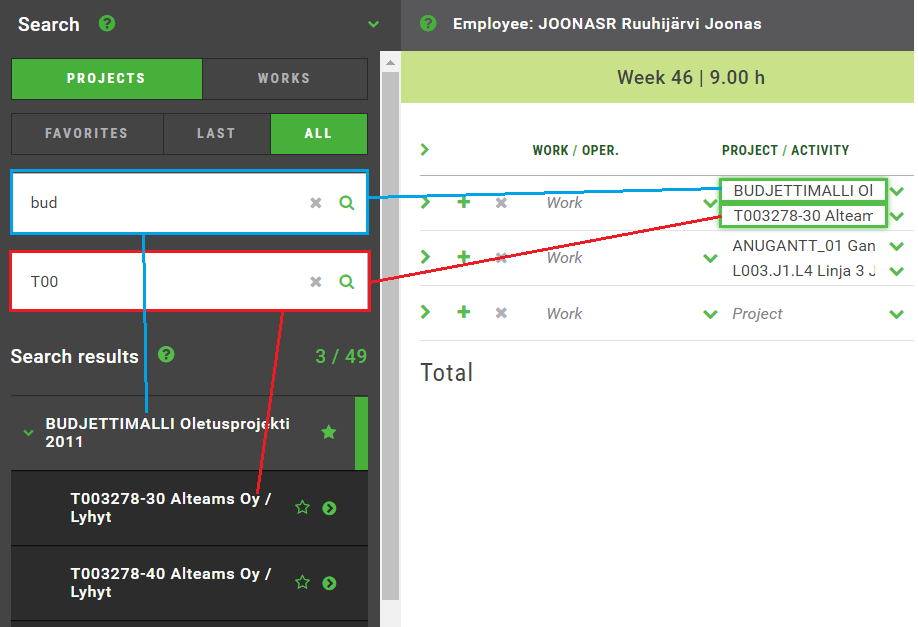
Figure 17 - An example of using the search fields in the search bar. The value in the first search field restricts the search of projects, the second field the search of activities. Values that meet the search criteria are highlighted in the timesheet.
To reset a search field, place the cursor in the field and press the ‘Esc’ key.
The search fields function together with the Favorites/Last/All selection; the search bar shows only those that meet both the search bar button and search field criteria.
The ’Works’ tab is only displayed in the portal if the time reporting method defined in the employee’s basic data allows the user to report hours for works (selection ‘Both’).
The numbers following the 'Search results' when ’Works’ tab is selected, reveal the following:
· The number of works that can be found with the search restricted by the set Favorites/Last/All selection and given search field entries (from among the works fetched to the browser).
· The total number of works fetched to the browser.
In addition to these, the database may include works that have not been fetched to the browser. Such works can be found with the help of search fields (for more information, see Chapter ‘Search Fields’).
By clicking on the ’Works’ tab, you can bring the works on display. Respectively, clicking on a work displays its operations. If the operations have already been fetched from the database, they will be immediately visible to the user. Conversely, if the operations are yet to be fetched from the database, they will be shown as soon as the search has been completed; the search starts automatically when clicking on the work.
You can mark works as your favorites by
clicking on the star icon next to the work name ![]() , in which case the icon turns from empty to filled
, in which case the icon turns from empty to filled ![]() . To remove
from Favorites, re-click on the icon so that it turns empty again.
. To remove
from Favorites, re-click on the icon so that it turns empty again.
Holding the cursor over a work displayes a hint box that reveals the work’s ID, name and customer name if the work has one.
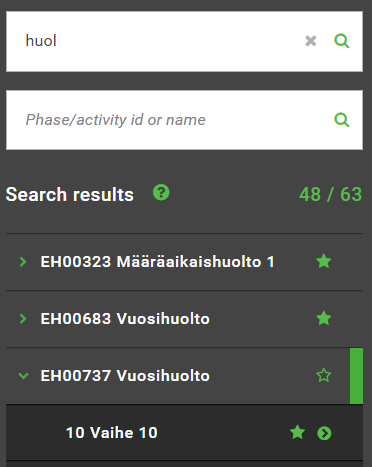
Figure 18 - An example of a ’Works’ listing generated by entering the value ’huol’ in the search field. The search has found 48 works that meet the search criteria, and the operations of one of these have been opened for display. Two works and one operation have been marked as the user’s Favorites (indicated by the filled star icons).
To display the operations of a work, simply click on the work. If the work has several operations, a scroll bar appears on the right hand side for browsing the list. You can mark an operation as your favorite by clicking on the star icon, the same way as with works. Holding the cursor over an operation displays a hint box revealing the operation ID and name.
Once you have found the desired operation, you can transfer it to the currently displayed week in the timesheet in one of two ways:
·
Click on the arrow icon ![]() next to the
operation to insert a new row in the timesheet. The work and operation are
automatically transferred to this row along with the project and activity
defined for the work.
next to the
operation to insert a new row in the timesheet. The work and operation are
automatically transferred to this row along with the project and activity
defined for the work.
· Drag and drop the operation into the desired row in the timesheet (empty or already filled). The row’s work, operation, project and activity will be updated based on the dragged row.
If the number of works is extensive, page navigation buttons will appear at the bottom of the list that allow you to browse the list back and forth.
![]()
Figure 19 - Page navigation buttons.
The numbers following the 'Search results' when ’Projects’ tab is selected, reveal the following:
· The number of projects that can be found with the set Favorites/Last/All selection and given search field entries (from among the projects fetched to the browser)
· The total number of projects fetched to the browser.
In addition to these, the database may include other projects that have not been fetched to the browser. These can be found with the help of search fields (for more information, see Chapter ‘Search Fields’).
Clicking the ’Projects’ tab displays projects. Respectively, clicking on a project displays its activities. If activities have already been fetched from the database, they will be shown immediately. If, however, activities are yet to be fetched from the database, they will be shown as soon as the search – which starts automatically by clicking the project – has been completed.
You can mark projects as your favorites by clicking on the start
icon ![]() next to the
project name, in which case the icon turns from empty to filled
next to the
project name, in which case the icon turns from empty to filled ![]() .
Respectively, you can remove a project from favorites by re-clicking on the
star. You can give the project a name, which will from
then on be used in your time reporting.
.
Respectively, you can remove a project from favorites by re-clicking on the
star. You can give the project a name, which will from
then on be used in your time reporting.
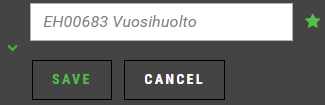
Figure 20 - An example of giving a name for a project. The user has clicked on the pen icon once, which has opened the text field for entering the new project name.
If you wish to delete a name that you have given to a project and the entry field is not shown, click the pen icon to display the field. You can name a project regardless of whether or not you have marked the project as your favorite. Upon need, re-click the star icon to set the desired status.
Holding the cursor over a project in the search bar list displays a hint box revealing the project ID, name and customer name if such exists for the project.
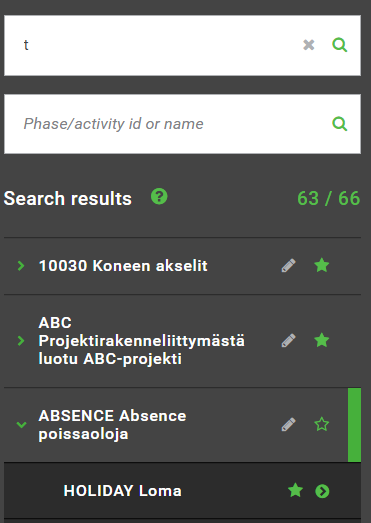
Figure 21 - An example of a ‘Projects’ listing, which has been generated by entering the value ‘t’ in the search field. A total of 63 projects meet the search criteria, and the user has opened the activities of one of these for display. Two projects and one activity have been marked as favorites.
To display the activities of a project, click on the project. If the number of activities is extensive, a scroll bar will appear on the right hand side for browsing the list. You can mark activities as your favorites by clicking on the start icon the same way as with projects. Holding the cursor over an activity displays a hint box revealing the activity’s ID and name.
Once you have found the desired activity, you can transfer it to the week that is currently open in the timesheet in one of two ways:
·
Click on the arrow icon next to the activity ![]() to insert a
new row in the timesheet. The system automatically transfers the project and
activity to this row.
to insert a
new row in the timesheet. The system automatically transfers the project and
activity to this row.
· Drag and drop the activity to the desired row (empty or already filled). The row’s project and activity are updated based on the dragged row.
If the number of projects is extensive, page navigation buttons will appear at the bottom of the list that allow you to browse back and forth.
![]()
Figure 22 - Page navigation buttons.
The Time Reporting portal can also be used offline without a network connection, provided that the necessary data have previously been fetched to your device’s browser online. Searches for projects and work operations are performed as normal, for example, with the search bar. To fetch project activities or work operations, click the desired project/work open in the search bar.
Time cards do not necessarily have to be fetched, unless you wish to use these as a basis for copying or to as a memory support. Upon need, time cards can be fetched by selecting the appropriate week in the calendar, in which case they are displayed in the timesheet once the search has been completed. Once fetched, the data are automatically saved in the browser.
Once all necessary data have been fetched,
turn on the airplane mode by clicking on the Earth icon ![]() in the top right
corner of the portal. After this, if you are online, you will be prompted to
select whether or not you wish to save the time cards and update parameters,
projects, works, time cards and the software search code. Saving is recommended
in order to ensure that the data downloaded to the browser will be updated with
the data fetched from the database. However, if a network connection is
unavailable as the mode is turned on, the question will not be presented.
in the top right
corner of the portal. After this, if you are online, you will be prompted to
select whether or not you wish to save the time cards and update parameters,
projects, works, time cards and the software search code. Saving is recommended
in order to ensure that the data downloaded to the browser will be updated with
the data fetched from the database. However, if a network connection is
unavailable as the mode is turned on, the question will not be presented.
To indicate that the airplane mode is
turned on, the Earth icon turns into an airplane ![]() ; after this, you can close the browser and disconnect the device
from the network.
; after this, you can close the browser and disconnect the device
from the network.
If starting the time reporting session without a network connection, open the browser and application as normal.
Note! It is essential that the web address (URL) contains a slash (/) at the end, such as:
http://server.fi/leansystem/
or
https://xxxintranet.com/leansystem/
In addition, it is crucial to always give the web address in exactly the same form. Without a network connection, the browser is unable to find the application if the form differs even slightly. Note also that letter case (upper and lower case) matters.
In the airplane mode, database searches and saving to database are prevented, and you are not able to log off the portal. Otherwise you can use the system as normal, i.e. apply the search bar and selection lists, insert new timesheet rows, modify existing rows, etc. If the necessary project or work cannot be found, you can leave the field empty and complete it later once the network connection becomes available again. Clicking on the ‘Save’ button saves the data in your device’s browser cache. After this, the browser can be closed.
Once the network connection is (re-)established, click on the airplane icon again. As a result, the system will ask the above-mentioned question about whether or not you wish to save the time cards and update parameters, projects, works, time cards and the software search code. If you reply yes, the time card data will be saved to the database.
The airplane mode can be used even when online, for example, if the connection is bad or breaking up. The purpose of the airplane mode is to prevent database searches; using this mode speeds up the use of the system in situations where database searches are not necessary.
Some browsers recognize the existence of a network connection automatically. In such case, the Earth icon in the top right corner reveals the network connection status:
|
|
|
Network connection exists |
|
|
|
Network connection unavailable (database searches and saving to the database are prevented) |
Note! Using the system offline without a network connection requires that the browse’s local cache memories are available and that they are not cleared during the session. Furthermore, you must use the system with the same device and the same browser, as all data are saved to the browser cache of your personal device.